Resource Library : Tutorials
Connect Grok to AtScale
This guide connects Grok to AtScale via MCP. Once connected, Grok will have access to AtScale’s models, enabling you to ask questions about your business data in natural language and get answers built from your own metric definitions.
This guide connects Grok to AtScale via MCP. Once connected, Grok will have access to AtScale’s models, enabling you to ask questions about your business data in natural language and get answers built from your own metric definitions.
Before you start
You need:
- Grok installed, and you are signed in
- An AtScale instance available to open ports with MCP server enabled
- Admin or application_admin role assigned in the Identity Broker
- At least one published model
- Credentials with read access to that model
Don’t have an AtScale environment yet? Book a demo.
Get your AtScale Client Secret and Remote MCP URL
Get your Client Secret:
In AtScale, go to Security → Clients → atscale-mcp → Credentials and copy the Client Secret.
! Do not regenerate the client secret !

A note on the Client Secret. You’ll sign in to AtScale through your browser. Grok never sees your password, and AtScale resolves you to your own role, so you see exactly the models, columns, and rows your account permits.
Get your Remote MCP server URL:
In AtScale, go to Security → Clients → atscale-mcp.
Scroll down to Access Settings where you will see your Root URL. Your Remote MCP server URL is your Root URL with “/mcp” added to the end. For example: https://atscale.example.com/mcp
Configure the MCP in Grok
Open Grok, go to Customize → MCPs → New MCP Server and paste in the code block below with your remote MCP server URL and client secret.
{“mcpServers”: {
“atscale”: {
“url”: “https://atscale.example.com/mcp”,
“auth”: {
“CLIENT_ID”: “atscale-mcp”,
“CLIENT_SECRET”: “paste-secret-here”
}
}
}
}
Note: Replace https://atscale.example.com/mcp with the remote MCP server URL for your AtScale instance, with /mcp added to the end.

This writes to ~/.cursor/mcp.json in your home folder. You can edit it directly if you prefer. Keep the secret out of any file inside a repo. For shared or production setups, use ${env:ATSCALE_CLIENT_SECRET} and set it in your environment.
Confirm the connection
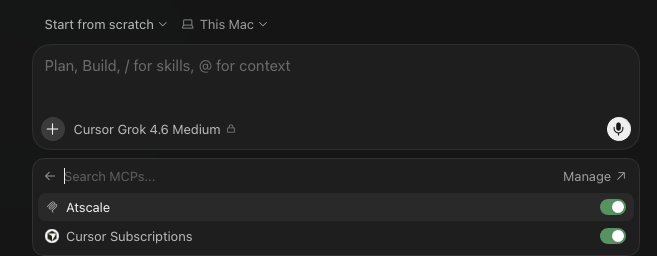
Ensure that the AtScale MCP is enabled in the session:
Ask:
What AtScale models and measures do you have access to?
You should get back a list of any models you have deployed, and a list of measures and dimensions.
Ask your data a question
Grok now has access to your models. Start with something you can check: a metric you’d recognize from a dashboard or report.
What was total [your metric] for [period]?
Compare the answer to what your BI tool reports. They should match, because both are reading the same definition from the same model.
Now ask something that you couldn’t ask on a dashboard.
Where do we have opportunities to improve efficiency?
Grok plans an approach, runs several queries against your model, and reasons over the results. This type of analysis would take a lot of clicking and pivoting in Excel or Power BI. Now, Grok brings the reasoning, your model brings the definitions.