Resource Library : Tutorials
Connect OpenAI to AtScale
This guide connects ChatGPT or Codex to AtScale via MCP. Once connected, ChatGPT or Codex will have access to AtScale’s models, enabling you to ask questions about your business data in natural language and get answers built from your own metric definitions.
This guide connects ChatGPT or Codex to AtScale via MCP. Once connected, ChatGPT or Codex will have access to AtScale’s models, enabling you to ask questions about your business data in natural language and get answers built from your own metric definitions.
Before you start
You need:
- ChatGPT Browser, Desktop, and/or Codex installed, and you are signed in
- An AtScale instance available to open ports with MCP server enabled
- Admin or application_admin role assigned in the Identity Broker
- At least one published model
- Credentials with read access to that model
Don’t have an AtScale environment yet? Book a demo.
Get your AtScale Client Secret and Remote MCP URL
Get your Client Secret:
In AtScale, go to Security → Clients → atscale-mcp → Credentials and copy the Client Secret.
! Do not regenerate the client secret !
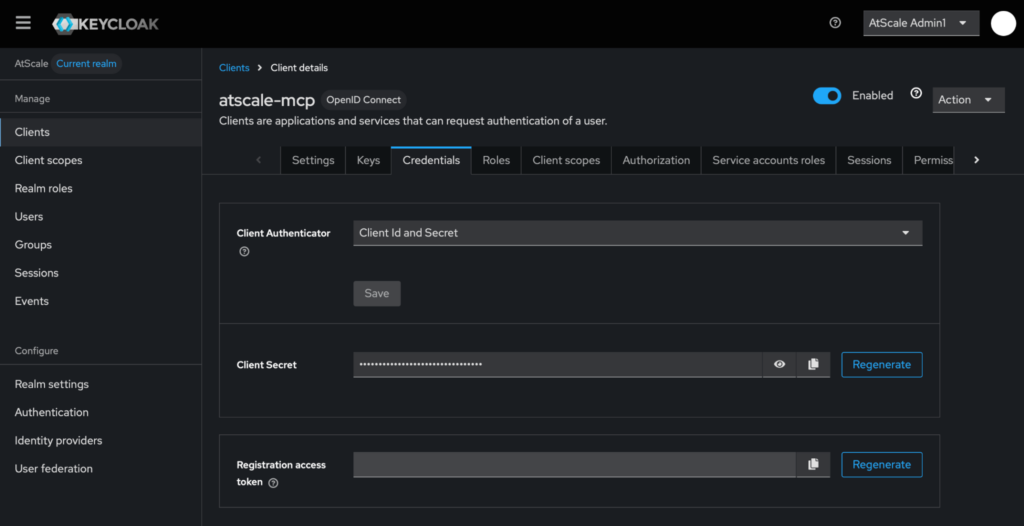
A note on the Client Secret. You’ll sign in to AtScale through your browser. Cursor never sees your password, and AtScale resolves you to your own role, so you see exactly the models, columns, and rows your account permits.
Get your Remote MCP server URL:
In AtScale, go to Security → Clients → atscale-mcp.
Scroll down to Access Settings where you will see your Root URL. Your Remote MCP server URL is your Root URL with “/mcp” added to the end. For example: https://atscale.example.com/mcp
Connect ChatGPT Browser to AtScale MCP
- Log in to ChatGPT in your browser. Ensure developer mode is enabled in settings.
- Go to Settings > Plugins > +.
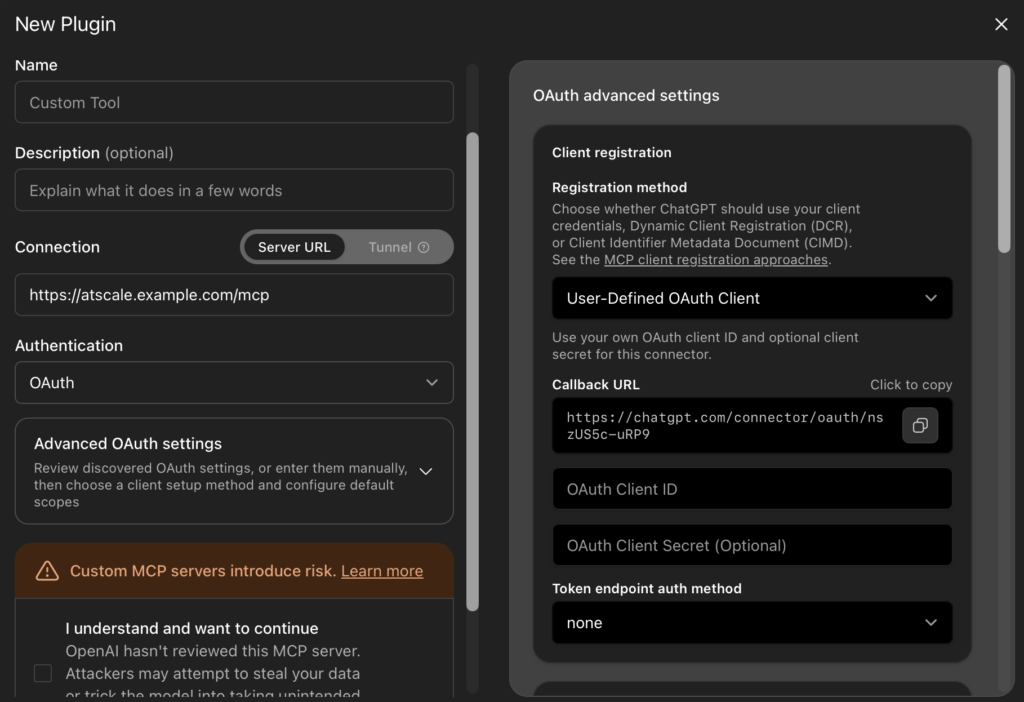
- In the New Plugin dialog, complete the following fields:
- Name: Enter a name for the plugin.
- Connection: Select Server URL and enter the URL for the AtScale MCP Server.
- Authentication: Select OAuth.
- Open Advanced OAuth settings and complete the following fields:
- Registration method: Select User-Defined OAuth Client.
- Callback URL: Copy this value. It’s unique to this plugin, and you’ll add it to AtScale in the next step.
- OAuth Client ID: Enter atscale-mcp.
- OAuth Client Secret: Enter the atscale-mcp client secret you copied above.
- Token endpoint auth method: Select client_secret_post.
- In AtScale, go to Security > Clients > atscale-mcp > Settings and add the callback URL you copied to Valid Redirect URIs. Save.
- Back in ChatGPT, check I understand and want to continue, then click Create.
- Click Connect next to your plugin.
- If you are not currently logged in to AtScale, you are redirected to your instance. Enter your login credentials when prompted.
To confirm the connection, ask:
What AtScale models and measures do you have access to?
You should get back a list of any models you have deployed, and a list of measures and dimensions.
Connect ChatGPT Desktop and Codex to AtScale MCP
The ChatGPT desktop app, Codex CLI, and the Codex IDE extension all read the same configuration file, so you set this up once and it works across all three. But that configuration has to be written to the file directly because the ‘Add server’ dialog in the desktop app has no field for an OAuth client ID.
These clients also can’t use a client secret. Apps that run on your machine can’t keep a secret safe, so they authenticate with PKCE instead, which proves identity through a one-time challenge rather than a stored password. That means a second AtScale client, configured without a secret. You’ll create it in Part 1.
You still sign in to AtScale through your browser, and AtScale still resolves you to your own role and permissions.
Part 1: Create the public client in AtScale
- Go to Security → Clients
- Click Create client
- Client type: OpenID Connect. Client ID: atscale-mcp-public. Next.
- On the capability screen:
- Client authentication: OFF ← the important one
- Standard flow: ON
- Everything else off. Next.
- On the login settings screen:
- Valid redirect URIs: http://localhost:8080/callback
- Leave the rest blank. Save.
- Open the new client → Advanced tab → find Proof Key for Code Exchange Code Challenge Method → set to S256 → Save.
If step 6 is hard to find, search the Advanced tab for “PKCE.” It’s under Advanced Settings.
Part 2: Configure ChatGPT/Codex
- Open ~/.codex/config.toml
- Append this configuration to the file:
[mcp_servers.atscale]url = “https://atscale.example.com/mcp”
scopes = [“openid”, “profile”, “email”]
[mcp_servers.atscale.oauth]
client_id = “atscale-mcp-public”
callback_port = 8080
These are the scopes the AtScale MCP server requires. Setting them explicitly avoids requesting realm-level scopes that don’t apply to MCP clients. The port here must match the redirect URI you registered in Part 1. Any free port works as long as both match.
Part 3: Connect
- Fully quit the ChatGPT desktop app, then reopen it.
- Settings → Plugins → MCPs. You should see atscale listed, flagged as needing OAuth. Click Authenticate. Browser opens to AtScale, sign in, approve.
Or from the terminal:
Shellcodex mcp login atscale
To confirm the connection, ask:
NoneWhat AtScale models and measures do you have access to?
You should get back a list of any models you have deployed, and a list of measures and dimensions.
Ask your data a question
ChatGPT and/or Codex now has access to your models. Start with something you can check: a metric you’d recognize from a dashboard or report.
NoneWhat was total [your metric] for [period]?
Compare the answer to what your BI tool reports. They should match, because both are reading the same definition from the same model.
Now ask something that you couldn’t ask on a dashboard.
NoneWhere do we have opportunities to improve efficiency?
The LLM plans an approach, runs several queries against your model, and reasons over the results. This type of analysis would take a lot of clicking and pivoting in Excel or Power BI. Now, Cursor brings the reasoning, your semantic model brings the definitions.